Thursday, December 8, 2011

Preparing to Travel...

Lloyd and I are getting ready to travel in SE Asia and India January to March, and my big decision has been what knitting project to pack. I normally consider socks the ideal take-along project--small, lots of stitches, and wearable when finished. However that works for a three week trip, but what about 2 1/2 months? A knitting friend suggested E Zimmermann's Pi shawl, and sure enough I have the book on my shelf:

She called it the Pi shawl because it's based on the geometry of a circle--the relationship of the circumference to the radius.
One other restriction is that I want to use only materials in my stash, and to that end I've chosen a yarn purchased in China 5 1/2 years ago plus some handpainted Koigu.
Isn't this a lovely label?
But unfortunately I can't quickly figure out how much yarn I have--apart from seeing that each ball is 125 grams. I could measure off a certain length, knit a swatch and calculate the area to figure out if I'll have enough, but I can't be bothered!
I have knit a swatch to see what size needles I'll use, plus I wanted to see how the combination of Koigu and Chinese yarn would work. Okay I think...
Interesting how *YO, K2tog* slants to the right, and *K2tog, YO* biases to the left...

Maybe I'll find some lovely fine yarn along the way that I can incorporate as well.
The idea is to knit until I run out of yarn--ideally this will make a nice big circular shawl which will be useful at some point during the trip.

Saturday, September 24, 2011

A Change of Pace...Finished a sweater!

When I finished Bob's stole, I decided that rather than start something new, I would finish a sweater that has been in pieces on one of my tables for a while--I had covered it up with a sheet so that I could use the table without disturbing it last spring! Here it is! I took a workshop called "Knit Until it Fits" in Kelowna two years ago with Paulette Lane. The idea is to start with a single stitch and then increase one at the beginning of each row with a yarn over. Knit until you have a triangle with an equal number of yarn overs on each selvedge and it's the width of your shoulders. Use the gauge calculated from this triangle to figure out how many stitches to cast on for other kinds of shapes.


I crocheted all the pieces together with a simple chain stitch (not a single crochet--I wanted the resulting seam to lie flat.) You can see from the back view that I could have made the initial triangle smaller--it's a little wide for my shoulders. This is probably due to the weight of the sleeves. The yarn is heavy with a lot of drape--it's a linen/wool blend.

I joined the sides with panels in which I did some waist shaping with short rows.

I'm happy with it--just need some cooler weather so I can wear it! We are enjoying unseasonably warm temperatures these days--it's been in the high 20's and low 30's in the Okanagan...breaking some long standing weather records.

Tuesday, September 20, 2011

Photos from Carolyn's ordination

I received the following e-mail from Carolyn yesterday. I made her stole last spring.

Janet- After a longer process than anticipated, I was ordained and got to wear the stole you created. Here are some pictures of me "in action" in it. So many people were amazed with your artistry and it truly proclaims my theology. Thanks again!

Blessings upon your minstry to those who minister.

Pastor Carolyn


Sunday, September 18, 2011

Bob's Ordination Day


What a happy and delighted guy!


The Abrams family on Bob's ordination day, September 17, 2011.


Back View


Suits him, don't you think?


I love getting pictures of my stoles being worn. They look so much better than on my dressmaker dummy!


Monday, September 12, 2011

A Picture of Kimiko at her Graduation, May 2011

I was thrilled to open an e-mail from Kimiko this afternoon. Attached was this picture:


And this message from Kimiko:


Hello Janet
I've been holding off to see if I could get a good photo from my graduation with the stole. There isn't really anything that truly shows it off. In the attached photo I am wearing the stole. This is just after the graduation ceremony. This is me with my mom and her sisters who all came to be part of the celebration of ministry ceremony.

The stole really is beautiful. I have had many people ask about it and they are always intrigued at the history from which it is made. I have also pinned my dad's mother's deaconess school pin to it so that she is also part of it.

I have it hanging on the wall of my office when I'm not wearing it. It also looks lovely hanging. I will try to get a photo of me wearing it to send to you so you can add it to your blog. Of course you may post the attached photo if you like.

many blessings
Kimiko

Thursday, September 1, 2011

Piping and finishing

I love to use striped ties as piping. Striped ties are obviously neckties and difficult to use in the main body of the garment--they scream "This stole is made from ties!" I prefer my work to be more subtle in that you have to get up very close before it's obvious that the stole is made from ties. In piping however, striped ties shine. These are the striped ties that came in this collection:


And the jumble of piping I created from the three ties:


Piping is a lovely way to finish the edges.


Once I applied the piping, all that was left was to stitch the lining and presto, the stole is finished!


Back view:


Wednesday, August 31, 2011

Dove and Flames

I decided to mount the dove on the gold metallic fabric--here's an image of trying that out, along with the start of some flames made from overlapping organza and tulle.


And then added even more fire...


Tomorrow is piping and lining...

Tuesday, August 30, 2011

Stitching a dove


Cathy has asked me to incorporate some of their children's baby clothing somehow. Tucked into a ziplock bag was a baby sock and a couple of remants from baptismal garments--some cotton eyelet and a scrap of rayon jacquard.

I thought the most obvious use for this fabric would be a dove: use the sock or part thereoff for the body and embellish the wings with the lace.


So, starting with the sock--the cuff fans out nicely to form the tail feathers!


And cutting the eyelet into strips meant that I could use it to embellish the wings:


And I used the little fragment of rayon jacquard for the head:


Here's a view of the dove on the back of the stole (it's not attached just yet):


And finally, I started playing around with the background, adding layers of organzas and gold metallic fabric:


I haven't made the final decision about this yet--I need to sleep on it! The layers of fabrics making up the dove are stitched, but the dove itself is not stitched to the stole and neither are the organzas. I find it best to wait a while before making a commitment.


Monday, August 29, 2011

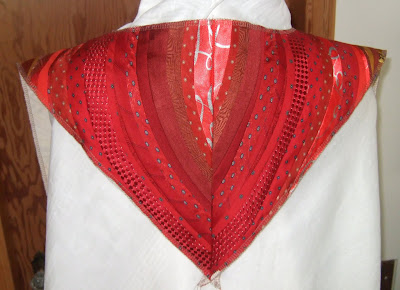
I finished the piecing today. Here you see the stole in its raw and organic form on my design wall.


The next task was to lay the pieces down on the cutting table and trim off the raw edges using the paper pattern. I over-estimated the shrinkage caused by piecing--I'd far rather be trimming than trying to add fabric at this stage!

I stitched the centre back seam and placed the stole on my mannequin. (I've used my linen table cloth to mimic the alb which Bob will wear under the stole.)

Here's what the back looks like at the stage:


Decisions to come:

(1) What to use for piping. These striped ties are a possibility.


(2) Create a dove which will be appliqued on the centre back.

(3) Decide on any other finishing embellishments.


So, now to take a bit of a break and walk to the library to return some books due today...think about what to make for dinner...and think about these next steps! Deliberate down time is crucial to my creative process. I have the best ideas either while knitting or walking.


Saturday, August 27, 2011

Starting to Piece Bob's Stole

Here's an image of the initial piecing on my pressing board:

It was at this point that I realized I had to be careful not to have all the pieces meet at a central point because the seams will make this area thick and bulky.
There weren't a lot of orange and yellow ties in the collection, however I was able to use several of the tie linings, some of which were beautiful gold satins.
I like to put the work up on my design wall so that I can look at it vertically and from a distance:

The piecing is almost done. I'm going to leave it at this point for the weekend and come back with fresh eyes on Monday.

Thursday, August 25, 2011

The Designing continues

My client commented that the first sketches are beautiful, making her think of a specific stained glass window that is particularly meaningful for the family.
She wondered if a radiating pattern like this stained glass were possible -- those sun bursts that start yellow and gradually fade to red. So, I have created another couple of sketches...


This will be a bit of a departure from my usual linear swirls but I'm looking forward to the technical challenges!
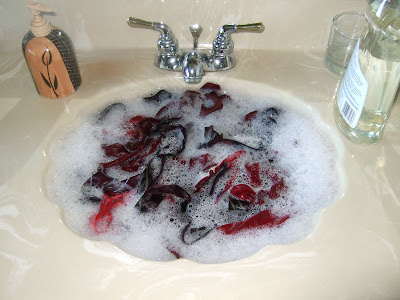
Meanwhile my husband took the ties apart while watching TV and I washed them yesterday...


After a couple of rinses, I spun them in my salad spinner, and then pressed them while damp and leave them hang to dry.


So, today will be spent cutting and stitching!


Tuesday, August 23, 2011

Beginning Another Stole for Ordination

A box of red ties arrived today...


I spent a pleasurable hour sorting them...


And thinking about possible designs:


Which one do you like?

I need to start work on this right away--Bob's ordination is September 17!


Saturday, July 2, 2011

A Special Birthday Gift

About 10 years ago, my friend Kathy brought over her Dad's neckties, saying "I'm never going to make anything out of these. Maybe you can sometime..." And so they languished in the closet in my studio...until a few days ago. A celebration was being planned for Kathy, and the idea of contributing cash to a group gift for some reason didn't appeal to me. I noticed the ties hanging in the closet..."that's what I'll do! I'll finally make something out of those!"


Kathy's father graduated from McGill University and he was a pilot in WWII. There were two ties in the collection that I remembered had particular significance: the tie with the crests is his university tie, and the other navy tie has airplanes as the repeating motif.


I decided to try and use the only red tie to piece the big number.


I used up every scrap of red to piece the 60. And I used up every bit of the airplane and McGill ties.

Here's the final outcome--a cushion to commemorate a special birthday. And best of all, when I presented it to her, she didn't notice the 60 at first--it's subtle enough. And it looks great in their living room too!


Wednesday, June 29, 2011

My final post about our experiences in Spain and France


We rented this Citroen Picasso at the Barcelona Airport and drove north into the Spanish Pyrenees, then the French Pyrenees, Montpellier and back to Barcelona. Lloyd is mighty pleased with himself in this image--he has just succeeded in parallel parking on the left side of the road.

It seems that every village, town and city in southern France has avenues of plane trees. Apparently many of them were planted in Napoleon's time and so of course now they're very big trees. It wasn't unusual to see memorials attached to some of the trees indicating that there had been MVA deaths--the roads are considerably narrower in these avenues.


This was Lastours and the site of one of the last stands of the Cathars just north east of Carcassonne.


Rooftops in the village of Beget in the Spanish Pyrenees, just north of Oix and Olot.


These fabulous swirling columns are at Parc Guell, in the northern part of Barcelona city. This was designed by Gaudi. Probably a more famous image from this park is the merandering ceramic bench that is on the terrace above this "Hall of Columns". When we were in the park, it seemed like every tourist had flocked there as well, and to the ceramic bench in particular. So we beat a retreat to the less populated areas like this one...and I found it less gaudy as well...


Finally, in Monserrat (a mountain-top monastery just north of Barcelona) this is a wonderful statue of Pau Casals, world famous cellist and composer, who was very proud of his Catalan roots...and who was an inspiration to my cello-playing father. I grew up listening to a lot of his music!